自定义底部标签栏
本指南介绍如何自定义 createBottomTabNavigator 中的标签栏。请确保首先根据 安装说明 安装和配置库。
¥This guide covers customizing the tab bar in createBottomTabNavigator. Make sure to install and configure the library according to the installation instructions first.
为每个选项卡添加图标
¥Add icons for each tab
这与自定义堆栈导航器的方式类似 - 有一些属性是在初始化选项卡导航器时设置的,而其他属性可以在 options 中按屏幕自定义。
¥This is similar to how you would customize a stack navigator — there are some properties that are set when you initialize the tab navigator and others that can be customized per-screen in options.
- Static
- Dynamic
// You can import Ionicons from @expo/vector-icons/Ionicons if you use Expo or
// react-native-vector-icons/Ionicons otherwise.
import Ionicons from 'react-native-vector-icons/Ionicons';

const RootTabs = createBottomTabNavigator({
  screenOptions: ({ route }) => ({
    tabBarIcon: ({ focused, color, size }) => {
      let iconName;

      if (route.name === 'Home') {
        iconName = focused
          ? 'ios-information-circle'
          : 'ios-information-circle-outline';
      } else if (route.name === 'Settings') {
        iconName = focused ? 'ios-list' : 'ios-list-outline';
      }

      // You can return any component that you like here!
      return <Ionicons name={iconName} size={size} color={color} />;
    },
    tabBarActiveTintColor: 'tomato',
    tabBarInactiveTintColor: 'gray',
  }),
  screens: {
    Home: HomeScreen,
    Settings: SettingsScreen,
  },
});
// You can import Ionicons from @expo/vector-icons/Ionicons if you use Expo or
// react-native-vector-icons/Ionicons otherwise.
import Ionicons from 'react-native-vector-icons/Ionicons';

function RootTabs() {
  return (
    <Tab.Navigator
      screenOptions={({ route }) => ({
        tabBarIcon: ({ focused, color, size }) => {
          let iconName;

          if (route.name === 'Home') {
            iconName = focused
              ? 'ios-information-circle'
              : 'ios-information-circle-outline';
          } else if (route.name === 'Settings') {
            iconName = focused ? 'ios-list' : 'ios-list-outline';
          }

          // You can return any component that you like here!
          return <Ionicons name={iconName} size={size} color={color} />;
        },
        tabBarActiveTintColor: 'tomato',
        tabBarInactiveTintColor: 'gray',
      })}
    >
      <Tab.Screen name="Home" component={HomeScreen} />
      <Tab.Screen name="Settings" component={SettingsScreen} />
    </Tab.Navigator>
  );
}
我们来剖析一下:
¥Let's dissect this:
-
tabBarIcon是底部选项卡导航器中受支持的选项。所以我们知道我们可以在options属性中的屏幕组件上使用它,但在本例中选择将其放在Tab.Navigator的screenOptions属性中,以便集中图标配置以方便使用。¥
tabBarIconis a supported option in bottom tab navigator. So we know we can use it on our screen components in theoptionsprop, but in this case chose to put it in thescreenOptionsprop ofTab.Navigatorin order to centralize the icon configuration for convenience. -
tabBarIcon是一个具有focused状态、color和size参数的函数。如果你进一步查看配置,你将看到tabBarActiveTintColor和tabBarInactiveTintColor。这些默认为 iOS 平台默认值,但你可以在此处更改它们。传递到tabBarIcon的color要么是活动的,要么是非活动的,具体取决于focused状态(聚焦为活动)。size是选项卡栏期望的图标大小。¥
tabBarIconis a function that is given thefocusedstate,color, andsizeparams. If you take a peek further down in the configuration you will seetabBarActiveTintColorandtabBarInactiveTintColor. These default to the iOS platform defaults, but you can change them here. Thecolorthat is passed through to thetabBarIconis either the active or inactive one, depending on thefocusedstate (focused is active). Thesizeis the size of the icon expected by the tab bar. -
有关
createBottomTabNavigator配置选项的更多信息,请阅读 完整的 API 参考。¥Read the full API reference for further information on
createBottomTabNavigatorconfiguration options.
向图标添加徽章
¥Add badges to icons
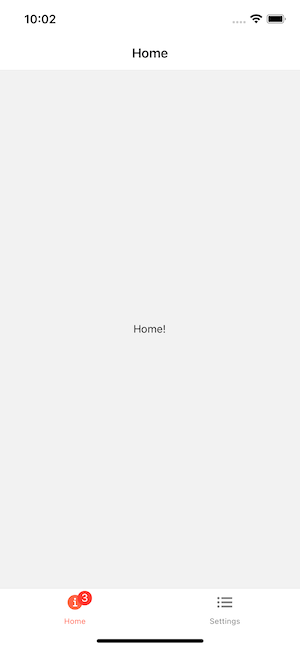
有时我们想给一些图标添加徽章。你可以使用 tabBarBadge 选项 来执行此操作:
¥Sometimes we want to add badges to some icons. You can use the tabBarBadge option to do it:
- Static
- Dynamic
const RootTabs = createBottomTabNavigator({
  screens: {
    Home: {
      screen: HomeScreen,
      options: {
        tabBarBadge: 3,
      },
    },
    Settings: SettingsScreen,
  },
});
function RootTabs() {
  return (
    <Tab.Navigator>
      <Tab.Screen
        name="Home"
        component={HomeScreen}
        options={{
          tabBarBadge: 3,
        }}
      />
      <Tab.Screen name="Settings" component={SettingsScreen} />
    </Tab.Navigator>
  );
}
从 UI 角度来看,该组件已可供使用,但你仍然需要找到某种方法从其他地方正确传递徽章计数,例如使用 React 上下文、Redux、MobX 或 事件触发器。
¥From UI perspective this component is ready to use, but you still need to find some way to pass down the badge count properly from somewhere else, like using React Context, Redux, MobX or event emitters.
你还可以使用 setOptions 方法从屏幕组件内部更新徽章:
¥You can also update the badge from within the screen component by using the setOptions method:
const navigation = useNavigation();

React.useEffect(() => {
  navigation.setOptions({
    tabBarBadge: unreadMessagesCount,
  });
}, [navigation, unreadMessagesCount]);